Customising Grid Views
Every data grid in Fished — from purchase orders and sales orders to stock reports and incoming invoices — can be customised to show exactly the columns you need, in the order you want. You can save the layout as a private view that only you can see, or publish it as a company view that all users can access.
|
Selecting and Arranging Columns
- Go to a list view (e.g. Orders > Purchase Orders).
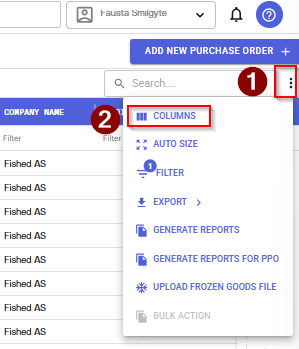
- Click the three-dot menu at the top right of the grid and select Columns.
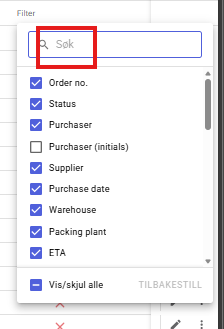
- Tick or untick to show or hide columns. Use the search field at the top of the panel to find a column quickly.
- To change the order, click and hold a column heading and drag it to the position you want.
- To change the width, adjust the vertical line between two columns.
B. Saving a Personal View
- Click the + icon to the right of the view tabs at the top of the grid.
- Enter a name for the view and click Create. The view appears in the drop-down list.
- To set it as your default view, click the star icon. The default view loads automatically every time you open that grid.
C. Saving a Company View
Not all users have permission to publish company views — this depends on the role you have been assigned.
- Create and name the view by following the steps above.
- Click the > (expand) icon next to the views drop-down to open the company views panel.
- Click the + icon in the company views panel to publish it as a company view.
D. Managing Views
Field | Description |
Deleting a personal view | Open the view and click the bin (delete) icon. Confirm in the dialogue. |
Deleting a company view | Click the > icon to expand, then click the bin icon to the right of the view name. |
Resetting to the saved layout | Click Reset View to discard unsaved changes and return to the last saved state. |
Removing a default view | Click the star icon to move the view back to the drop-down list. It then no longer loads automatically. |
TIP | Works everywhere Grid view customisation is available in every list view across the platform — the procedure is identical for all grids. |
Tilpasse rutenettvisninger
Alle datarutenett i Fished — fra innkjøpsordrer og salgsordrer til lagerrapporter og inngående fakturaer — kan tilpasses slik at de viser nøyaktig de kolonnene du trenger, i den rekkefølgen du ønsker. Du kan lagre oppsettet som en privat visning som bare du ser, eller publisere det som en selskapsvisning alle brukere har tilgang til.
|
A. Velge og ordne kolonner
- Gå til en listevisning (f.eks. Orders > Purchase Orders).
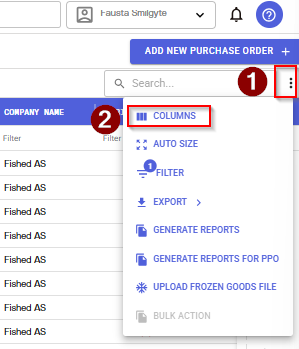
- Klikk trepunktsmenyen øverst til høyre i rutenettet og velg Columns (kolonner).
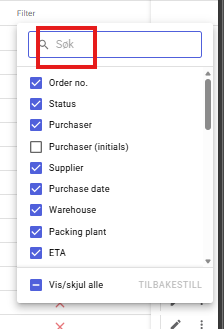
- Merk av eller fjern avmerking for å vise eller skjule kolonner. Bruk søkefeltet øverst i panelet for å finne en kolonne raskt.
- For å endre rekkefølgen klikker du og holder på en kolonneoverskrift og drar den til ønsket plassering.
- For å endre bredden justerer du den loddrette streken mellom to kolonner.
B. Lagre en personlig visning
- Klikk +-ikonet til høyre for visningsfanene øverst i rutenettet.
- Skriv inn et navn på visningen og klikk Create (opprett). Visningen vises i nedtrekkslisten.
- For å sette den som standardvisning klikker du stjerneikonet. Standardvisningen lastes automatisk hver gang du åpner det rutenettet.
C. Lagre en selskapsvisning
Ikke alle brukere har tilgang til å publisere selskapsvisninger — dette avhenger av rollen du er tildelt.
- Opprett og navngi visningen ved å følge stegene over.
- Klikk >-ikonet (utvid) ved siden av nedtrekkslisten for visninger for å åpne panelet for selskapsvisninger.
- Klikk +-ikonet i panelet for selskapsvisninger for å publisere den som en selskapsvisning.
D. Administrere visninger
Felt | Beskrivelse |
Slette en personlig visning | Åpne visningen og klikk søppelbøtteikonet (slett). Bekreft i dialogvinduet. |
Slette en selskapsvisning | Klikk >-ikonet for å utvide, og klikk deretter søppelbøtteikonet til høyre for visningsnavnet. |
Tilbakestille til lagret oppsett | Klikk Reset View (tilbakestill visning) for å forkaste ulagrede endringer og gå tilbake til sist lagrede tilstand. |
Fjerne en standardvisning | Klikk stjerneikonet for å flytte visningen tilbake til nedtrekkslisten. Den lastes da ikke automatisk lenger. |
TIPS | Fungerer overalt Tilpasning av rutenettvisninger er tilgjengelig i alle listevisninger i hele plattformen — framgangsmåten er identisk for alle rutenett. |
Was this article helpful?
That’s Great!
Thank you for your feedback
Sorry! We couldn't be helpful
Thank you for your feedback
Feedback sent
We appreciate your effort and will try to fix the article